
Arduino Rain Detector with LCD Display and Silent Alert
Introduction
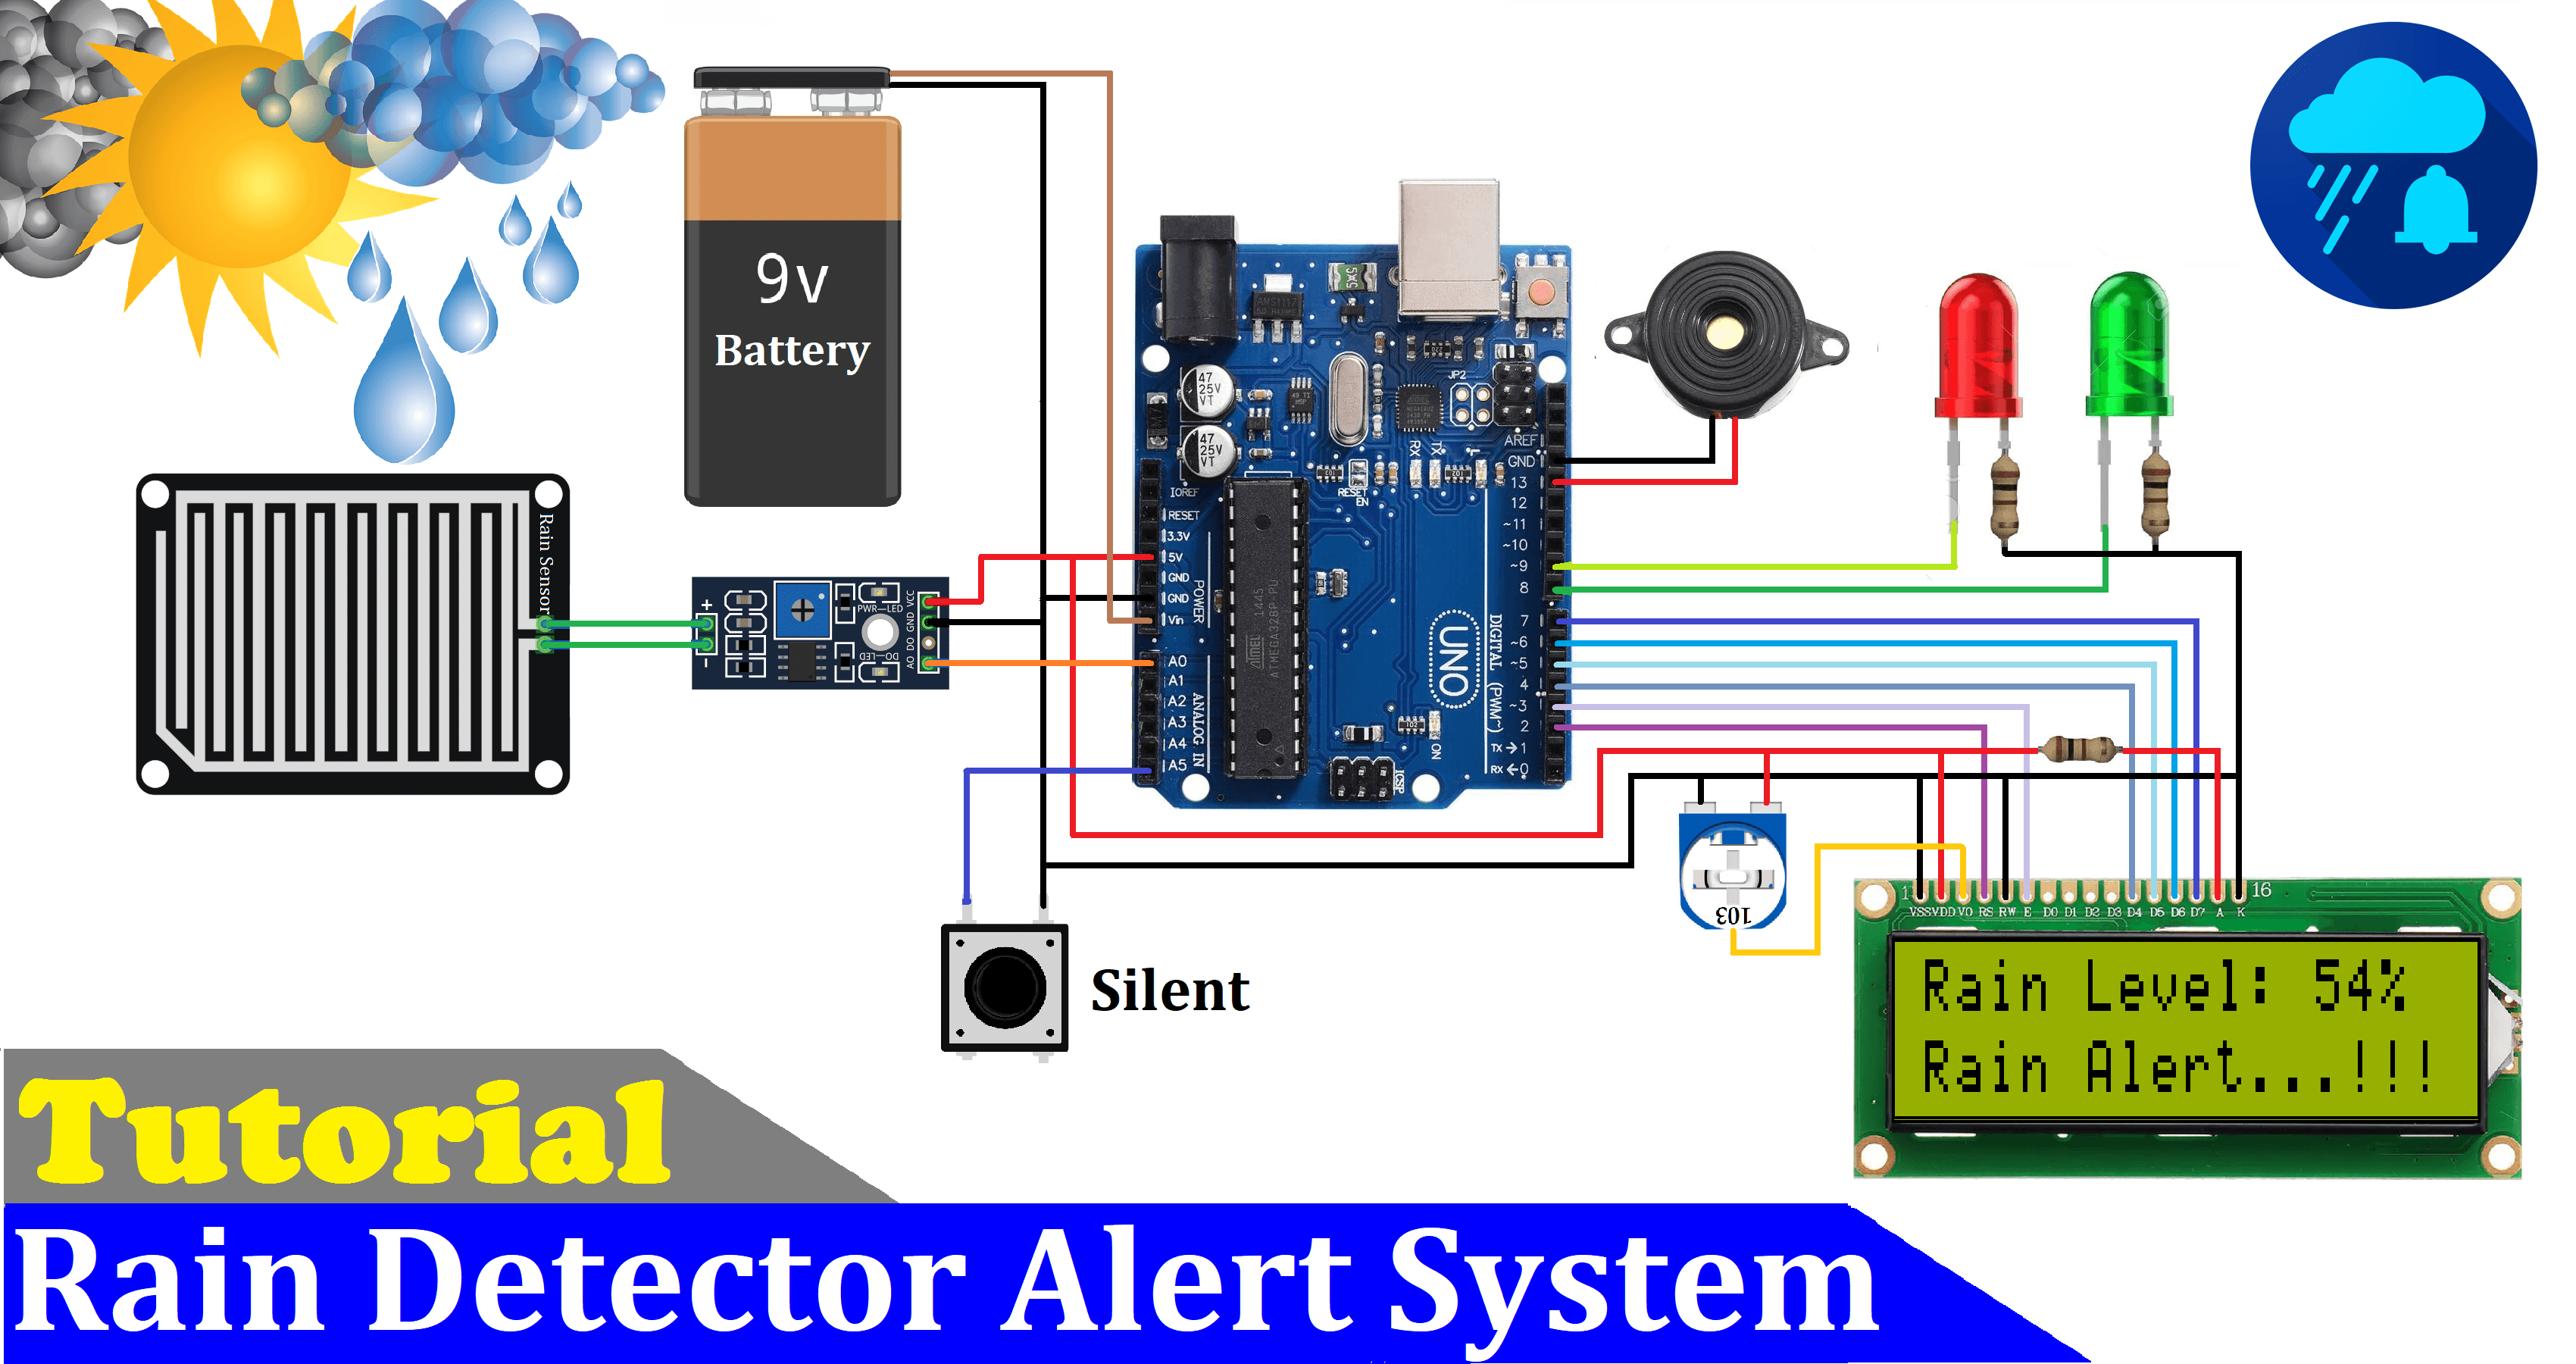
An Arduino Rain Detector is an IoT and electronics project that detects rain using a rain sensor and displays the estimated rain level on a 16x2 LCD. It uses red and green LEDs to indicate rain alerts and normal conditions, along with a buzzer for audible warnings.
This project also includes a silent mode button, allowing users to disable the buzzer during a rain alert.
It is a useful beginner project for learning about analog sensors, LCD interfacing, digital outputs, and conditional programming with Arduino.
Project Objectives
- Detect rain using a rain sensor module.
- Read the sensor's analog output using Arduino.
- Display an estimated rain level on a 16x2 LCD.
- Activate a red LED and buzzer when the rain level crosses a threshold.
- Turn on a green LED during normal conditions.
- Provide a silent mode to suppress the buzzer.
Components Required
| Component | Quantity |
|---|---|
| Arduino Uno | 1 |
| Rain sensor module with analog output | 1 |
| 16x2 LCD display | 1 |
| 10 kΩ potentiometer for LCD contrast | 1 |
| Red LED | 1 |
| Green LED | 1 |
| Current-limiting resistors for LEDs | 2 |
| Push button | 1 |
| Active buzzer | 1 |
| Breadboard and jumper wires | As required |
| USB cable or suitable power supply | 1 |
Circuit Diagram
Place your circuit diagram here after creating it with the correct pin connections.

Circuit Connections
Rain Sensor
| Rain Sensor Pin | Arduino Pin |
|---|---|
| AO | A0 |
| VCC | 5V, if supported by the module |
| GND | GND |
Use the sensor's analog output (AO) because the program reads it with analogRead().
16x2 LCD in 4-Bit Mode
| LCD Pin | Arduino Pin |
|---|---|
| RS | 2 |
| E | 3 |
| D4 | 4 |
| D5 | 5 |
| D6 | 6 |
| D7 | 7 |
| VSS | GND |
| VDD | 5V |
| VO | Potentiometer middle pin |
| RW | GND |
| LED+ | 5V through suitable current limiting, if required |
| LED- | GND |
Connect the potentiometer's outer pins to 5V and GND to adjust the LCD contrast.
LEDs, Buzzer, and Silent Button
| Component | Arduino Pin |
|---|---|
| Green LED | 8 |
| Red LED | 9 |
| Buzzer positive | 13 |
| Silent button | A5 |
| Silent button other terminal | GND |
The button uses INPUT_PULLUP, so pressing it reads LOW. Connect each LED through an appropriate current-limiting resistor. Check the buzzer's voltage and current requirements before connecting it directly to an Arduino pin; use a transistor driver if needed.
How the Project Works
- The rain sensor detects water on its sensing surface and produces an analog signal.
- Arduino reads the signal from analog pin A0.
- The
map()function converts the ADC reading into an estimated percentage. - The LCD displays the calculated rain level.
- If the calculated value is greater than 30%, the red LED turns on and the rain alert message appears.
- If silent mode is not enabled, the buzzer sounds during the rain alert.
- When the value returns to 30% or below, the green LED turns on and the normal message appears.
- Pressing the silent button enables silent mode for the current alert. In this program, silent mode resets when the system returns to normal conditions.
Important: The displayed percentage is an estimate based on the code's mapping, not a calibrated meteorological measurement. Sensor readings and polarity can vary by module. Test your particular sensor and calibrate the threshold before using the system.
Arduino Source Code
#include <LiquidCrystal.h> // LCD library

// Arduino pins connected to the LCD
LiquidCrystal lcd(2, 3, 4, 5, 6, 7);

#define sensor_pin A0

int adc_value;
int percent_value;

#define bt_silent A5
int silent = 0;

#define G_led 8
#define R_led 9

#define buzzer 13

void setup() {
  pinMode(sensor_pin, INPUT);
  pinMode(bt_silent, INPUT_PULLUP);

  pinMode(R_led, OUTPUT);
  pinMode(G_led, OUTPUT);
  pinMode(buzzer, OUTPUT);

  lcd.begin(16, 2);
  lcd.clear();

  lcd.setCursor(0, 0);
  lcd.print("   Welcome To   ");

  lcd.setCursor(0, 1);
  lcd.print(" Rain Detector ");

  delay(2000);
  lcd.clear();
}

void loop() {
  adc_value = analogRead(sensor_pin);

  // Convert ADC reading to an estimated percentage
  percent_value = map(adc_value, 0, 1023, 100, 0);

  // Enable silent mode when the button is pressed
  if (digitalRead(bt_silent) == LOW) {
    silent = 1;
    delay(100);
  }

  lcd.setCursor(0, 0);
  lcd.print("Rain Level: ");
  lcd.print(percent_value);
  lcd.print("%  ");

  lcd.setCursor(0, 1);

  if (percent_value > 30) {
    if (silent == 0) {
      digitalWrite(buzzer, HIGH);
    }

    lcd.print("Rain Alert...!!!");

    digitalWrite(G_led, LOW);
    digitalWrite(R_led, HIGH);

    delay(300);
  } else {
    silent = 0;

    lcd.print(".....Normal.....");

    digitalWrite(G_led, HIGH);
    digitalWrite(R_led, LOW);
  }

  digitalWrite(buzzer, LOW);
  delay(100);
}
Code Explanation
1. LCD Initialization
#include <LiquidCrystal.h>
LiquidCrystal lcd(2, 3, 4, 5, 6, 7);
The LiquidCrystal library controls the 16x2 LCD. The six Arduino pins are used for the LCD's register select, enable, and four data connections.
2. Reading the Rain Sensor
adc_value = analogRead(sensor_pin);
Arduino reads the sensor's analog voltage and converts it into a digital value from 0 to 1023 on a standard 10-bit ADC.
3. Calculating the Estimated Percentage
percent_value = map(adc_value, 0, 1023, 100, 0);
This maps a lower ADC reading to a higher percentage and a higher ADC reading to a lower percentage. This direction depends on the sensor module and may need adjustment after testing.
4. Rain Alert Condition
if (percent_value > 30) {
  // Rain alert
}
When the estimated percentage exceeds 30, the program displays a rain warning, turns on the red LED, and sounds the buzzer unless silent mode is enabled.
5. Silent Mode
if (digitalRead(bt_silent) == LOW) {
  silent = 1;
  delay(100);
}
Because the button uses INPUT_PULLUP, pressing it connects A5 to GND and produces a LOW reading. The program sets silent to 1 to suppress the buzzer during an alert.
6. Normal Condition
When the estimated rain level is 30% or lower, the program displays the normal message, turns on the green LED, turns off the red LED, and resets silent mode.
Implementation Steps
- Connect the rain sensor's analog output to A0.
- Wire the 16x2 LCD according to the connection table.
- Connect the green LED to pin 8 and the red LED to pin 9 through resistors.
- Connect the buzzer to pin 13, observing its electrical requirements.
- Connect the silent button between A5 and GND.
- Open Arduino IDE and select the correct board and port.
- Upload the source code to the Arduino Uno.
- Open the LCD and check that the welcome message appears.
- Test the sensor with dry and wet conditions, observing the LCD percentage and LEDs.
- Press the silent button during an alert to test buzzer suppression.
Expected Output
| Condition | LCD Display | Green LED | Red LED | Buzzer |
|---|---|---|---|---|
| Normal / dry condition, based on threshold | Rain Level and Normal | ON | OFF | OFF |
| Rain level above 30% | Rain Level and Rain Alert | OFF | ON | Sounds intermittently |
| Rain alert with silent mode enabled | Rain Level and Rain Alert | OFF | ON | OFF |
Actual readings depend on your rain sensor, its orientation, water coverage, and calibration.
Troubleshooting
LCD shows no text
- Check the 5V and GND connections.
- Adjust the contrast potentiometer.
- Verify the RS, E, and D4–D7 connections.
- Confirm that
lcd.begin(16, 2)is present.
Rain percentage behaves unexpectedly
- Check that the sensor's analog output is connected to A0.
- Observe raw ADC values in the Serial Monitor.
- Reverse or recalibrate the mapping if the sensor behaves in the opposite direction.
- Adjust the threshold after testing dry and wet conditions.
Buzzer does not sound
- Check the buzzer polarity and operating voltage.
- Confirm that the program has not enabled silent mode.
- Use a suitable transistor driver if the buzzer draws more current than an Arduino pin can safely supply.
Silent button does not work
- Connect the button between A5 and GND.
- Confirm that
pinMode(bt_silent, INPUT_PULLUP)is present.
LCD shows leftover characters
- Ensure the text written to each LCD row covers the previous message. The supplied program uses trailing spaces for the rain percentage, but you may need additional spaces if you change the displayed text.
Applications
- Basic rain detection for homes and classrooms.
- Rain-warning demonstrations for electronics labs.
- Educational sensor and microcontroller projects.
- Prototypes for smart irrigation and weather-monitoring systems.
- Demonstrations of audible and visual alert systems.
Advantages
- Beginner-friendly and relatively inexpensive.
- Displays sensor readings in real time.
- Combines visual and audible alerts.
- Includes a simple silent mode.
- Helps learners understand analog input and conditional logic.
Limitations
- The percentage is not a scientifically calibrated rainfall measurement.
- A typical rain sensor board detects water on its surface rather than measuring rainfall in millimeters.
- The system has no internet connectivity or remote notifications.
- The button's silent mode is reset when the reading returns to normal.
- Exposed resistive rain-sensor plates can corrode over time.
Future Improvements
- Add Wi-Fi using an ESP32 or ESP8266 for remote alerts.
- Send rain notifications to a mobile application or dashboard.
- Store sensor readings for later analysis.
- Add a rain sensor calibration feature.
- Improve the silent button with debouncing and a clear mute-status indicator.
- Replace blocking delays with a
millis()-based timing approach for more responsive operation.
Conclusion
The Arduino Rain Detector with LCD Display and Silent Alert is a practical beginner IoT project that combines a rain sensor, LCD, LEDs, buzzer, and push button. It demonstrates how a microcontroller can monitor environmental conditions and respond with useful alerts.
It also provides a foundation for developing more advanced weather-monitoring and smart-home systems.