
Arduino Electronic Dice Using a 7-Segment Display
Introduction
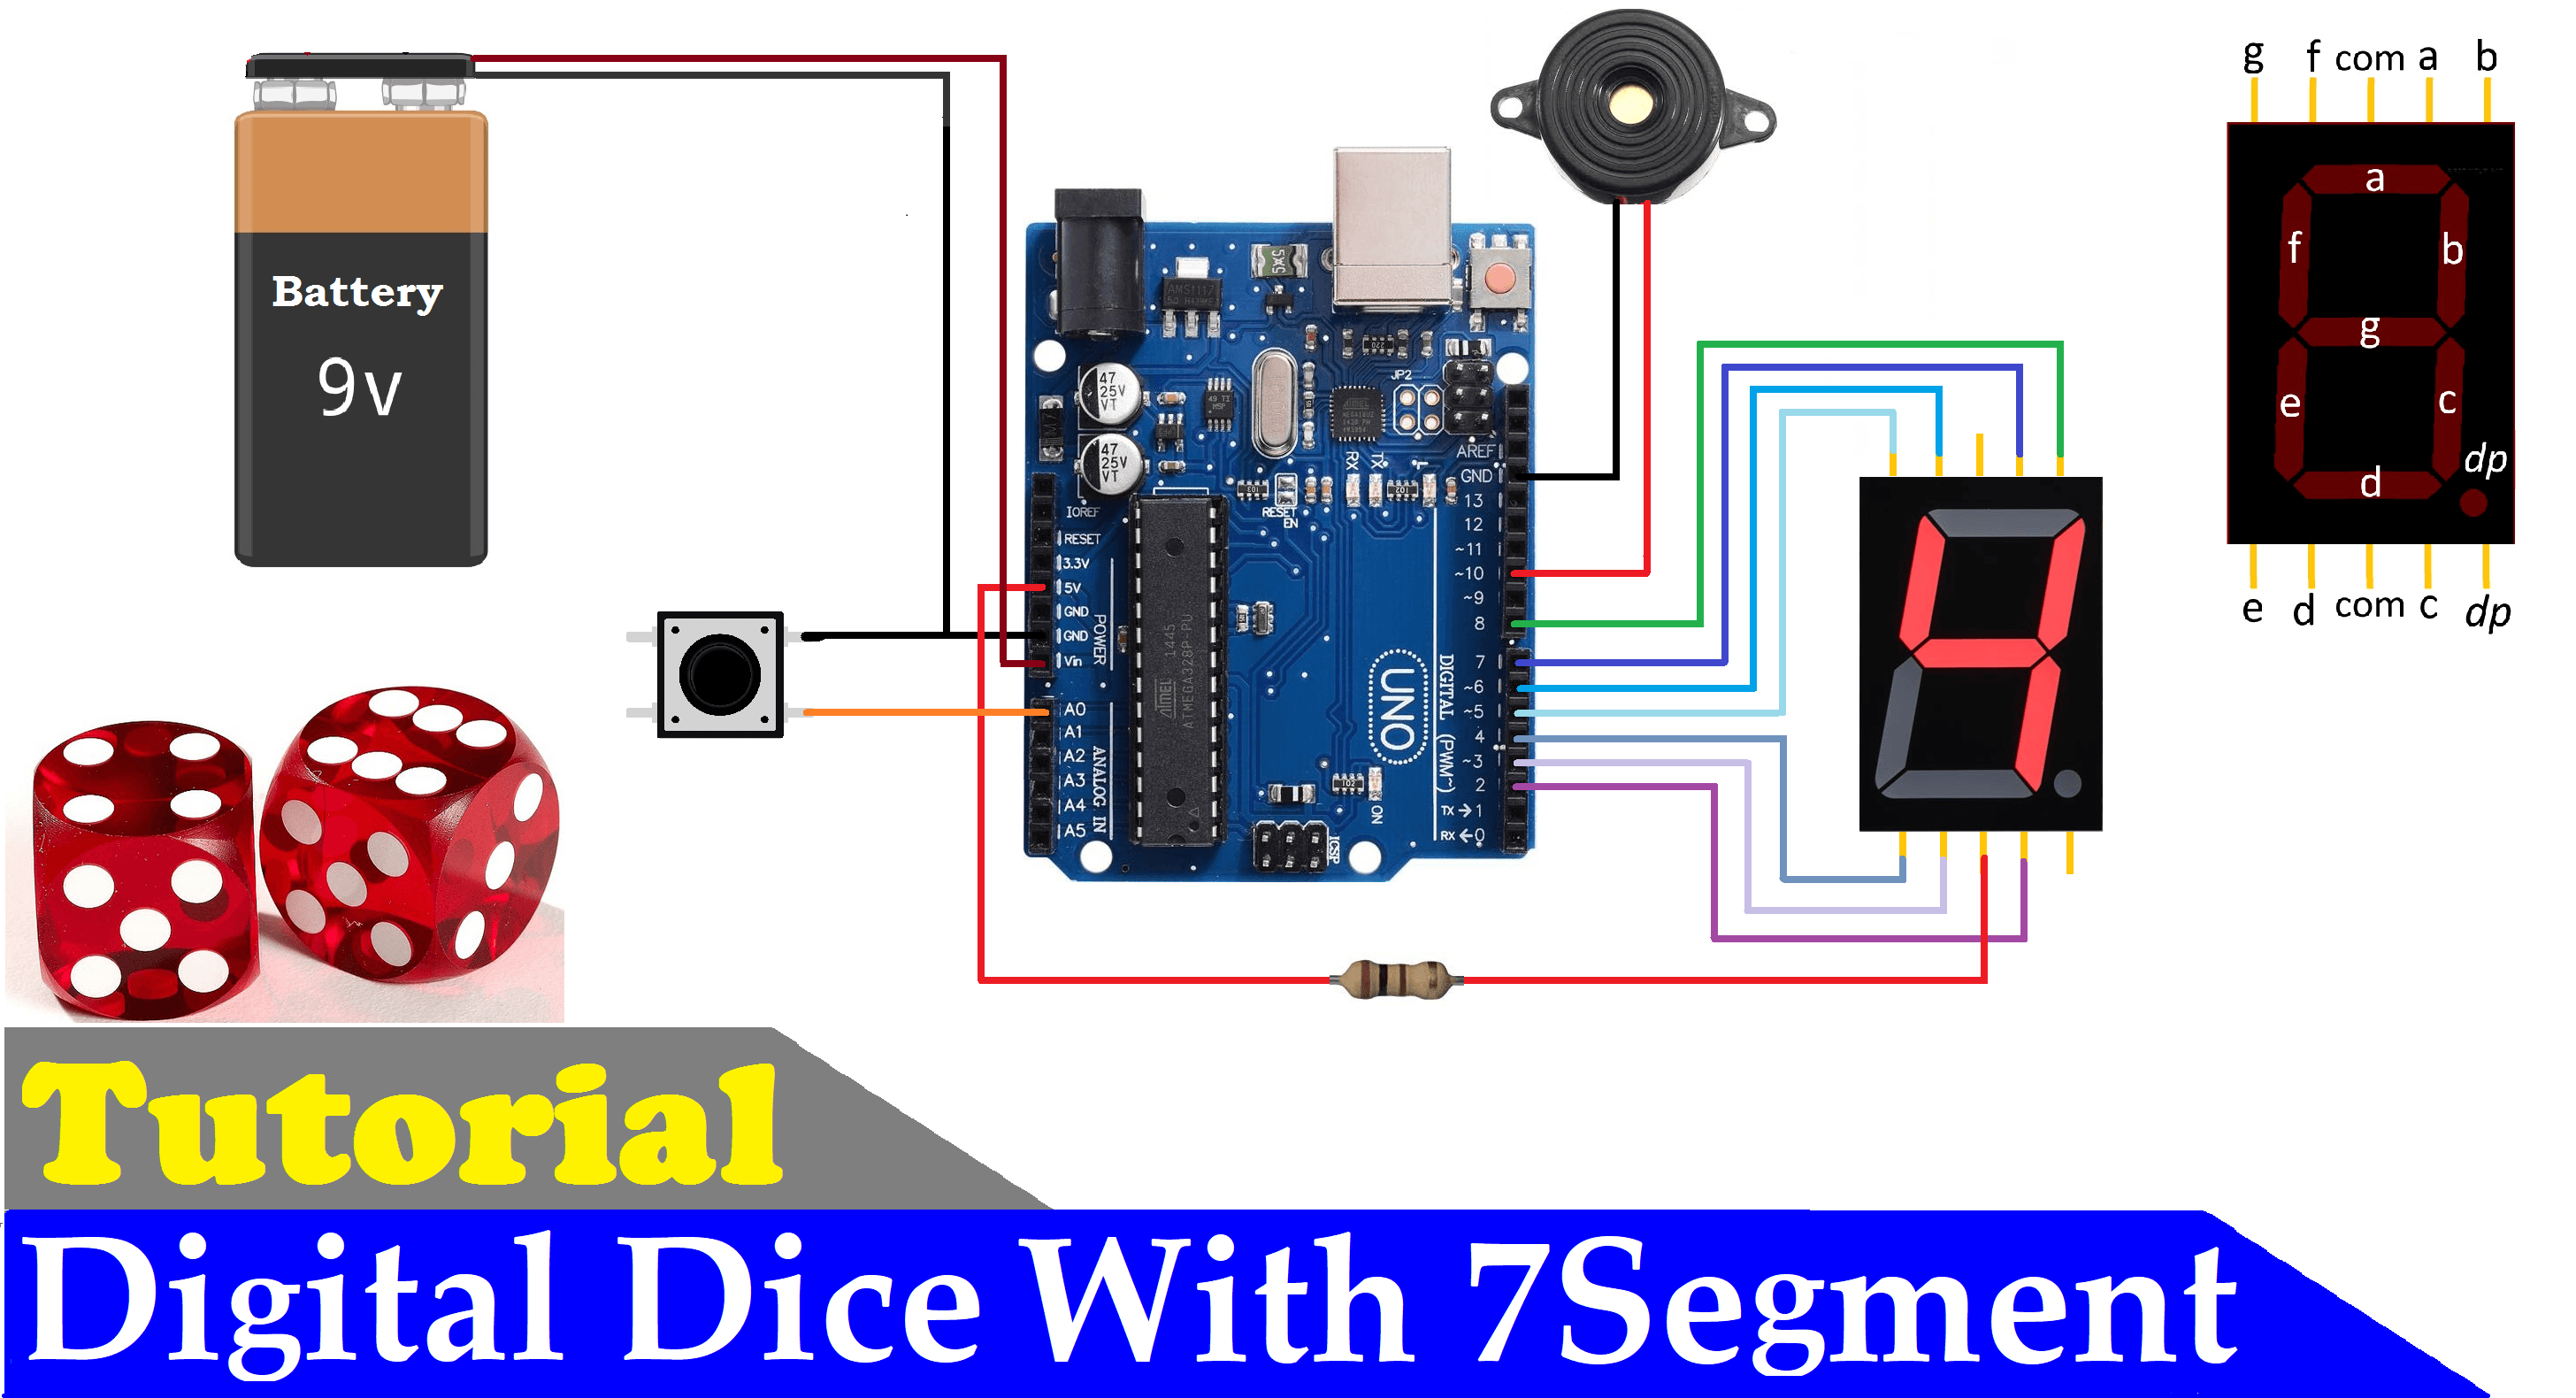
The Arduino Electronic Dice is a beginner-friendly electronics project that simulates a traditional six-sided dice using an Arduino Uno, a seven-segment display, a push button, and a buzzer.
When the system starts, the display performs a countdown from 9 to 0 with sound effects. After initialization, pressing the push button starts a dice-rolling animation. The display shows randomly generated numbers from 1 to 6, and a buzzer produces clicking sounds during the animation.
This project demonstrates how to generate random numbers, control a seven-segment display, read push-button input, and produce audio feedback using Arduino programming.
Project Objectives
- Generate random dice numbers from 1 to 6.
- Display numbers using a seven-segment display.
- Start the dice animation with a push button.
- Produce sound effects using a buzzer.
- Understand Arduino digital output, input pull-ups, and random number generation.
Components Required
| Component | Quantity |
|---|---|
| Arduino Uno | 1 |
| Seven-segment display (7-segment LED) | 1 |
| Push button | 1 |
| Buzzer | 1 |
| 220Ω resistors | Up to 7 |
| Breadboard | 1 |
| Jumper wires | As required |
| USB cable | 1 |
Note: Confirm whether your seven-segment display is common-cathode or common-anode before assembling the circuit. The supplied code defaults to common-cathode operation.
Circuit Connections
Seven-Segment Display
| Segment | Arduino Pin |
|---|---|
| A | Digital pin 7 |
| B | Digital pin 8 |
| C | Digital pin 2 |
| D | Digital pin 3 |
| E | Digital pin 4 |
| F | Digital pin 6 |
| G | Digital pin 5 |
Connect each segment through an appropriate current-limiting resistor. Connect the display's common pin or pins according to the display type and its datasheet.
Push Button and Buzzer
| Component | Arduino Connection |
|---|---|
| Push button terminal 1 | Analog pin A0 |
| Push button terminal 2 | GND |
| Buzzer positive (+) | Digital pin 10 |
| Buzzer negative (−) | GND |
| Unconnected analog input for random seed | A5 |
The push button uses Arduino's internal pull-up resistor, so the input reads HIGH when the button is released and LOW when pressed.
The A5 input is used to initialize the random number generator. For better randomness, leave it unconnected as intended by the supplied code.
Working Principle
The electronic dice operates in the following sequence:
- Initialization: The Arduino initializes the display segments, push button, and buzzer.
- Startup countdown: The display shows numbers from 9 down to 0, accompanied by short beeps.
- Waiting state: The system waits for the user to press the push button.
- Dice animation: When the button is pressed, the Arduino generates random numbers from 1 to 6 and displays them in a rolling animation.
- Slowing animation: The display updates gradually more slowly to imitate a physical dice roll.
- Final sound: A longer beep signals the end of the rolling sequence.
Arduino Source Code
Upload the following code to your Arduino Uno using the Arduino IDE.
#define aPin 7
#define bPin 8
#define cPin 2
#define dPin 3
#define ePin 4
#define fPin 6
#define gPin 5

// Pin configuration
#define PIN_BUTTON A0
#define PIN_BUZZER 10

const byte PIN_CHAOS = A5;

// Other configuration
const unsigned int BEEP_FREQUENCY = 3000;

int On = 1;  // On=0 for common anode; On=1 for common cathode
int Off;

void setup() {
  randomSeed(analogRead(PIN_CHAOS));

  pinMode(aPin, OUTPUT);
  pinMode(bPin, OUTPUT);
  pinMode(cPin, OUTPUT);
  pinMode(dPin, OUTPUT);
  pinMode(ePin, OUTPUT);
  pinMode(fPin, OUTPUT);
  pinMode(gPin, OUTPUT);

  pinMode(PIN_BUTTON, INPUT_PULLUP);
  pinMode(PIN_BUZZER, OUTPUT);

  // Indicate that the system is ready
  for (int i = 9; i >= 0; i--) {
    showNumber(i);
    tone(PIN_BUZZER, BEEP_FREQUENCY, 100);
    delay(300);
  }

  tone(PIN_BUZZER, BEEP_FREQUENCY, 250);
  delay(1000);
}

void loop() {
  int buttonState = digitalRead(PIN_BUTTON);

  if (buttonState == LOW) {
    rollTheDice(10, 100);
    rollTheDice(5, 200);
    rollTheDice(3, 300);
    rollTheDice(1, 100);

    tone(PIN_BUZZER, BEEP_FREQUENCY, 250);

    // Wait until the button is released
    while (digitalRead(PIN_BUTTON) == LOW) {
      delay(10);
    }
  }
}

void rollTheDice(int count, int delayLength) {
  for (int i = 0; i < count; i++) {
    int number = random(1, 7);

    tone(PIN_BUZZER, BEEP_FREQUENCY, 5);
    showNumber(number);
    delay(delayLength);
  }
}

void showNumber(int x) {
  if (On == 1) {
    Off = 0;
  } else {
    Off = 1;
  }

  switch (x) {
    case 1: one(); break;
    case 2: two(); break;
    case 3: three(); break;
    case 4: four(); break;
    case 5: five(); break;
    case 6: six(); break;
    case 7: seven(); break;
    case 8: eight(); break;
    case 9: nine(); break;
    default: zero(); break;
  }
}

void one() {
  digitalWrite(aPin, Off);
  digitalWrite(bPin, On);
  digitalWrite(cPin, On);
  digitalWrite(dPin, Off);
  digitalWrite(ePin, Off);
  digitalWrite(fPin, Off);
  digitalWrite(gPin, Off);
}

void two() {
  digitalWrite(aPin, On);
  digitalWrite(bPin, On);
  digitalWrite(cPin, Off);
  digitalWrite(dPin, On);
  digitalWrite(ePin, On);
  digitalWrite(fPin, Off);
  digitalWrite(gPin, On);
}

void three() {
  digitalWrite(aPin, On);
  digitalWrite(bPin, On);
  digitalWrite(cPin, On);
  digitalWrite(dPin, On);
  digitalWrite(ePin, Off);
  digitalWrite(fPin, Off);
  digitalWrite(gPin, On);
}

void four() {
  digitalWrite(aPin, Off);
  digitalWrite(bPin, On);
  digitalWrite(cPin, On);
  digitalWrite(dPin, Off);
  digitalWrite(ePin, Off);
  digitalWrite(fPin, On);
  digitalWrite(gPin, On);
}

void five() {
  digitalWrite(aPin, On);
  digitalWrite(bPin, Off);
  digitalWrite(cPin, On);
  digitalWrite(dPin, On);
  digitalWrite(ePin, Off);
  digitalWrite(fPin, On);
  digitalWrite(gPin, On);
}

void six() {
  digitalWrite(aPin, On);
  digitalWrite(bPin, Off);
  digitalWrite(cPin, On);
  digitalWrite(dPin, On);
  digitalWrite(ePin, On);
  digitalWrite(fPin, On);
  digitalWrite(gPin, On);
}

void seven() {
  digitalWrite(aPin, On);
  digitalWrite(bPin, On);
  digitalWrite(cPin, On);
  digitalWrite(dPin, Off);
  digitalWrite(ePin, Off);
  digitalWrite(fPin, Off);
  digitalWrite(gPin, Off);
}

void eight() {
  digitalWrite(aPin, On);
  digitalWrite(bPin, On);
  digitalWrite(cPin, On);
  digitalWrite(dPin, On);
  digitalWrite(ePin, On);
  digitalWrite(fPin, On);
  digitalWrite(gPin, On);
}

void nine() {
  digitalWrite(aPin, On);
  digitalWrite(bPin, On);
  digitalWrite(cPin, On);
  digitalWrite(dPin, On);
  digitalWrite(ePin, Off);
  digitalWrite(fPin, On);
  digitalWrite(gPin, On);
}

void zero() {
  digitalWrite(aPin, On);
  digitalWrite(bPin, On);
  digitalWrite(cPin, On);
  digitalWrite(dPin, On);
  digitalWrite(ePin, On);
  digitalWrite(fPin, On);
  digitalWrite(gPin, Off);
}
Code improvement: The code includes a button-release wait after the dice roll. This prevents one long button press from immediately triggering repeated rolls. It does not implement full software debouncing, so a very noisy button may still require additional filtering.
Code Explanation
randomSeed(analogRead(PIN_CHAOS)): Initializes the pseudo-random number generator using an analog reading.INPUT_PULLUP: Enables the internal pull-up resistor for the push button.random(1, 7): Generates a pseudo-random integer between 1 and 6, inclusive.showNumber(number): Selects the appropriate display pattern for the generated number.tone(): Generates a sound at the specified frequency.rollTheDice(count, delayLength): Repeatedly generates and displays numbers with a selected delay.digitalWrite(): Turns individual seven-segment display segments on or off.
Step-by-Step Implementation
Step 1: Assemble the Circuit
Connect the seven-segment display, push button, and buzzer to the Arduino according to the connection tables.
Step 2: Configure the Display Type
The supplied code is configured for a common-cathode display. If using a common-anode display, change:
int On = 1;
to:
int On = 0;
Make sure the display's common terminals are wired appropriately for the chosen type.
Step 3: Upload the Code
- Open the Arduino IDE.
- Create a new sketch.
- Paste the source code.
- Select Arduino Uno under Tools → Board.
- Select the correct serial port.
- Click Upload.
Step 4: Test the Dice
After uploading, the display should count down from 9 to 0 with beeps. Once the startup sequence finishes, press the push button to begin rolling the electronic dice.
The display should cycle through random numbers and eventually stop on a number from 1 to 6.
Expected Output
- On startup, the display counts down from 9 to 0.
- The buzzer beeps during the countdown.
- Pressing the button starts the dice animation.
- Numbers from 1 to 6 appear in rapid succession.
- The animation slows down before finishing.
- A final beep indicates that the roll is complete.
Troubleshooting
| Problem | Possible Solution |
|---|---|
| Display segments do not light up | Check the segment pin mapping, common terminals, and resistors. |
| Numbers appear incorrectly | Verify the display type and segment wiring. |
| Button does not start the roll | Check the A0 and GND connections. |
| Buzzer produces no sound | Verify buzzer polarity and compatibility with tone(). |
| Numbers seem predictable | Check the A5 analog input and understand that Arduino's random() is pseudo-random. |
| Display is too dim | Check the resistors, wiring, and display specifications. |
Applications
- Electronic dice for board games.
- Arduino learning and demonstration projects.
- Random number generation experiments.
- Digital electronics laboratory exercises.
- Embedded systems and microcontroller practice.
Future Improvements
- Add a second seven-segment display to show scores.
- Add an OLED or LCD to display roll history.
- Include a reset button.
- Add a counter for the number of dice rolls.
- Use a 3D-printed enclosure for a finished product.
- Add multiple dice modes for board games.
Advantages
- Simple and affordable hardware.
- Beginner-friendly Arduino programming.
- Interactive button-based operation.
- Visual and audio feedback.
- Easily expandable for educational and gaming applications.
Limitations
- The project depends on correct seven-segment wiring.
- The
random()function is pseudo-random rather than cryptographically secure. - An unconnected analog pin provides a seed, but does not guarantee perfect randomness.
- The basic design supports only one displayed digit at a time.
Conclusion
The Arduino Electronic Dice project is a practical introduction to digital electronics and embedded programming. It combines random number generation, seven-segment display control, push-button input, and buzzer feedback in one interactive device.
It is a useful beginner project for learning Arduino and can be extended with additional displays, scorekeeping, and custom game features.
Project category: IoT
Difficulty: Beginner
Platform: Arduino Uno
Main components: Seven-segment display, push button, and buzzer