
Arduino Car Parking Assistant Using Ultrasonic Sensor
Introduction
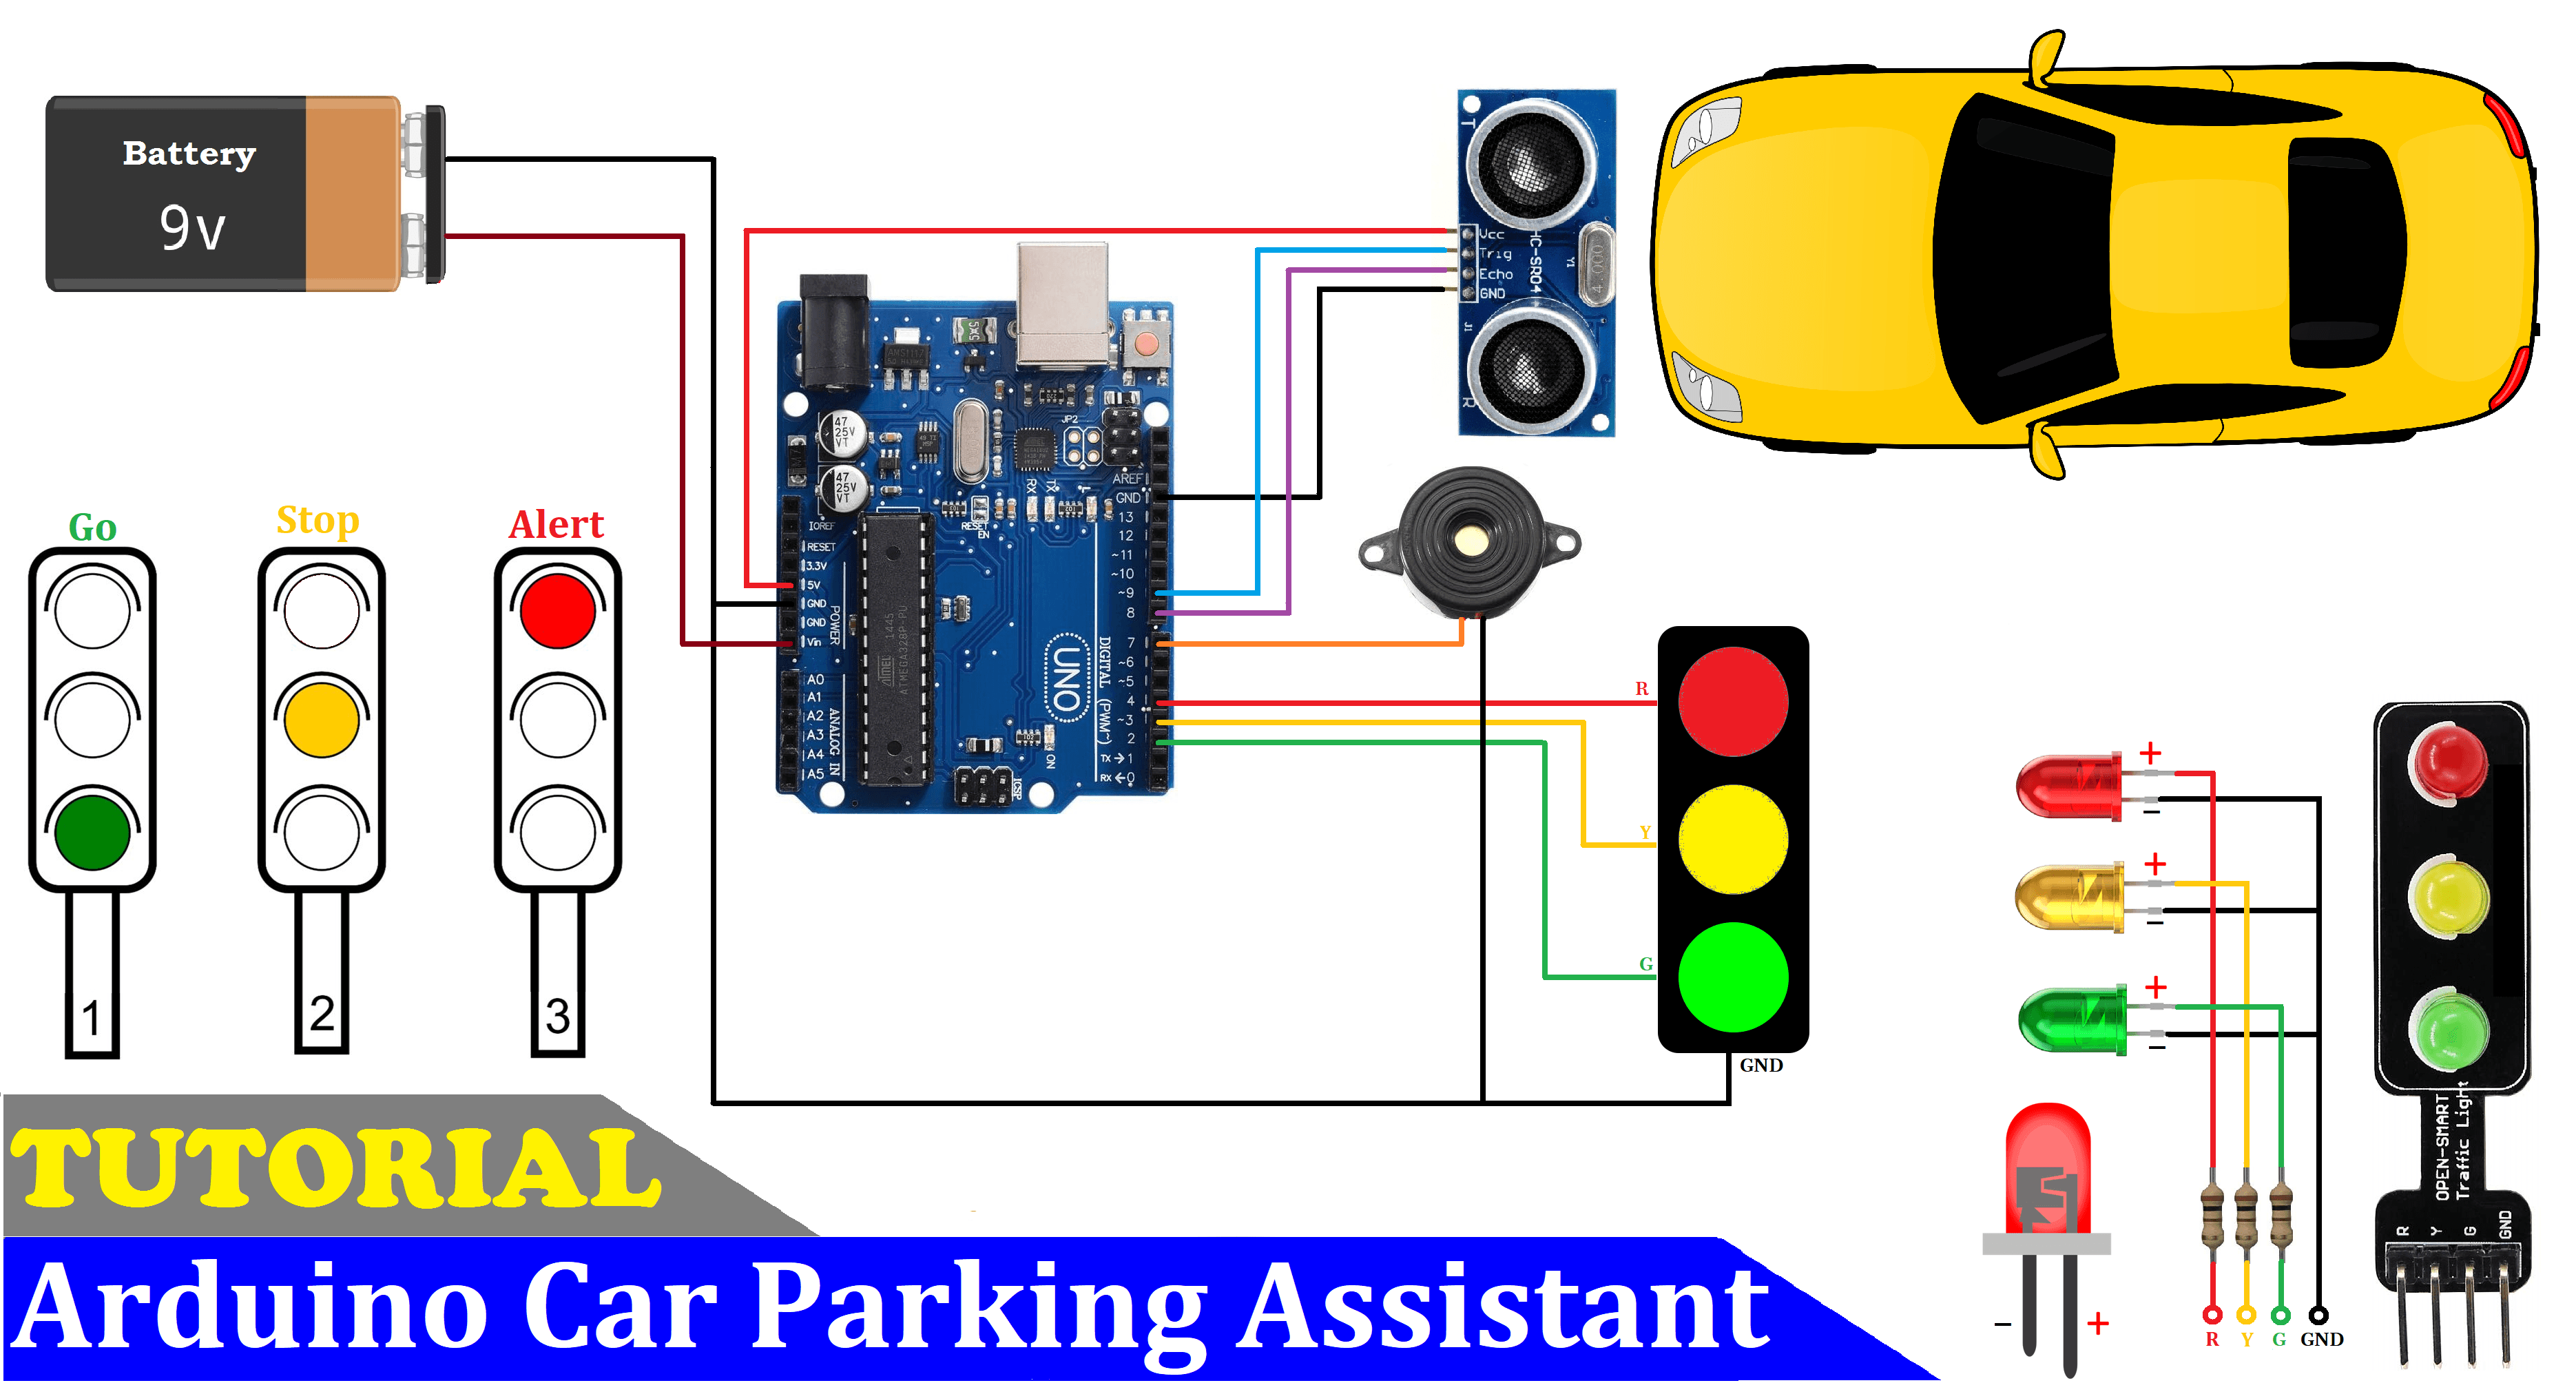
The Arduino Car Parking Assistant is a beginner-friendly IoT and electronics project that helps drivers estimate the distance between their vehicle and a nearby obstacle. It uses an ultrasonic sensor to measure distance and provides visual and audio alerts through three LEDs and a buzzer.
As the vehicle approaches an obstacle, the system changes the LED indicators according to the measured distance. When the obstacle gets very close, the red LED turns on and the buzzer sounds an alert.
This project is useful for learning Arduino programming, ultrasonic distance measurement, digital input/output, and basic embedded system design.
Project Objectives
- Measure the distance between a vehicle and an obstacle.
- Display parking distance conditions using red, yellow, and green LEDs.
- Activate a buzzer when an obstacle is dangerously close.
- Understand how an HC-SR04 ultrasonic sensor works with an Arduino.
- Build a low-cost prototype for learning parking assistance systems.
Components Required
| Component | Quantity | Purpose |
|---|---|---|
| Arduino Uno | 1 | Main controller |
| HC-SR04 ultrasonic sensor | 1 | Measures obstacle distance |
| Red LED | 1 | Indicates a very close obstacle |
| Yellow LED | 1 | Indicates a nearby obstacle |
| Green LED | 1 | Indicates a farther obstacle |
| Buzzer | 1 | Provides an audio warning |
| 220Ω resistors | 3 | Limit LED current |
| Breadboard | 1 | Circuit assembly |
| Jumper wires | As required | Electrical connections |
| USB cable | 1 | Programming and power |
Circuit Connections
Connect the components to the Arduino Uno according to the following table.
| Component | Arduino Pin |
|---|---|
| HC-SR04 TRIG | Digital pin 9 |
| HC-SR04 ECHO | Digital pin 8 |
| Buzzer positive (+) | Digital pin 7 |
| Red LED anode (+) through resistor | Digital pin 4 |
| Yellow LED anode (+) through resistor | Digital pin 3 |
| Green LED anode (+) through resistor | Digital pin 2 |
| HC-SR04 VCC | 5V |
| HC-SR04 GND | GND |
| LED cathodes (−) | GND |
| Buzzer negative (−) | GND |
Important: Connect each LED through its own current-limiting resistor. Check your buzzer's voltage and current requirements before connecting it directly to an Arduino pin.
Working Principle
The project operates by measuring the time taken for an ultrasonic pulse to travel to an obstacle and return to the sensor.
- The Arduino sends a short trigger pulse to the HC-SR04 sensor.
- The sensor emits ultrasonic sound waves.
- The sound waves reflect from a nearby obstacle.
- The ECHO pin produces a pulse whose duration represents the round-trip travel time.
- The Arduino calculates the approximate distance in centimeters.
- The LEDs and buzzer respond according to the measured distance.
Distance-Based Indications
| Measured Distance | Red LED | Yellow LED | Green LED | Buzzer |
|---|---|---|---|---|
| Less than 4 cm | ON | OFF | OFF | ON |
| 4 cm to less than 12 cm | OFF | ON | OFF | OFF |
| 12 cm to less than 25 cm | OFF | OFF | ON | OFF |
| 25 cm or more | OFF | OFF | OFF | OFF |
The buzzer is activated only when the measured distance is below 4 cm. These thresholds can be adjusted in the Arduino code to suit your demonstration.
Arduino Source Code
Upload the following code to your Arduino Uno using the Arduino IDE.
#define echo 8
#define trigger 9

#define buzzer 7

#define R_led 4
#define Y_led 3
#define G_led 2

int distance_cm;
int flag = 0;

void setup() {
  Serial.begin(9600);

  pinMode(echo, INPUT);
  pinMode(trigger, OUTPUT);

  pinMode(buzzer, OUTPUT);

  pinMode(R_led, OUTPUT);
  pinMode(Y_led, OUTPUT);
  pinMode(G_led, OUTPUT);

  digitalWrite(trigger, LOW);
  digitalWrite(buzzer, LOW);

  delay(100);
}

void loop() {
  distance_cm = Ultrasonic_read();

  if (distance_cm < 4) {
    // Very close obstacle: danger alert
    flag = !flag;

    digitalWrite(R_led, HIGH);
    digitalWrite(Y_led, LOW);
    digitalWrite(G_led, LOW);
  }
  else if (distance_cm >= 4 && distance_cm < 12) {
    // Nearby obstacle
    flag = 0;

    digitalWrite(R_led, LOW);
    digitalWrite(Y_led, HIGH);
    digitalWrite(G_led, LOW);
  }
  else if (distance_cm >= 12 && distance_cm < 25) {
    // Obstacle at a greater distance
    flag = 0;

    digitalWrite(R_led, LOW);
    digitalWrite(Y_led, LOW);
    digitalWrite(G_led, HIGH);
  }
  else {
    // No obstacle within the configured range
    flag = 0;

    digitalWrite(R_led, LOW);
    digitalWrite(Y_led, LOW);
    digitalWrite(G_led, LOW);
  }

  digitalWrite(buzzer, flag);

  Serial.print("Distance: ");
  Serial.print(distance_cm);
  Serial.println(" cm");

  delay(150);
}

int Ultrasonic_read() {
  digitalWrite(trigger, LOW);
  delayMicroseconds(2);

  digitalWrite(trigger, HIGH);
  delayMicroseconds(10);

  digitalWrite(trigger, LOW);

  long time = pulseIn(echo, HIGH, 30000UL);

  if (time == 0) {
    return 999;
  }

  return time / 58;
}
Code Explanation
#define echo 8: Assigns digital pin 8 to the sensor's ECHO signal.#define trigger 9: Assigns digital pin 9 to the sensor's TRIG signal.pinMode(): Configures Arduino pins as inputs or outputs.digitalWrite(): Controls the LEDs, buzzer, and trigger signal.pulseIn(): Measures the duration of the returned ultrasonic pulse.time / 58: Converts the measured round-trip pulse duration into an approximate distance in centimeters.Serial.print(): Displays the measured distance in the Serial Monitor.delay(150): Adds a short pause between readings.
Code improvement: This version adds a timeout to pulseIn() and returns 999 when no echo is received. It also explicitly resets the trigger signal to LOW after sending the pulse. This prevents a missing echo from blocking the program for too long.
The original code toggled the buzzer flag whenever the obstacle was under 4 cm. The version above preserves that behavior, producing an intermittent alert rather than a continuous tone.
Step-by-Step Implementation
Step 1: Assemble the Circuit
Place the Arduino Uno and ultrasonic sensor on your workbench. Connect the sensor, three LEDs, and buzzer according to the circuit connection table.
Step 2: Install the Arduino IDE
Install the Arduino IDE on your computer and connect the Arduino Uno using a USB cable.
Step 3: Upload the Code
- Open the Arduino IDE.
- Create a new sketch.
- Copy and paste the Arduino source code.
- Select Arduino Uno under Tools → Board.
- Select the correct serial port.
- Click Upload.
Step 4: Test the Project
Open the Serial Monitor and select a baud rate of 9600. Move your hand or another suitable object toward and away from the ultrasonic sensor.
Observe how the LED indicators change as the measured distance crosses each threshold. Move the object closer than 4 cm to test the buzzer.
Step 5: Adjust the Thresholds
Modify the distance conditions in the loop() function to customize the warning zones for your project demonstration.
Expected Output
- Obstacle farther than 25 cm: All LEDs remain off and the buzzer is silent.
- Obstacle between 12 cm and 25 cm: The green LED turns on.
- Obstacle between 4 cm and 12 cm: The yellow LED turns on.
- Obstacle closer than 4 cm: The red LED turns on and the buzzer produces an intermittent warning.
The Serial Monitor displays the approximate measured distance in centimeters.
Troubleshooting
| Problem | Possible Solution |
|---|---|
| Distance always shows 999 cm | Check the TRIG/ECHO wiring, sensor power, ground, and target surface. |
| LEDs do not turn on | Check LED polarity, resistor connections, and Arduino pin assignments. |
| Buzzer does not sound | Verify buzzer polarity, voltage, and whether it is an active or passive buzzer. |
| Distance readings fluctuate | Keep the sensor stable and test against a broad, flat surface. |
| Arduino does not upload code | Verify the selected board, USB cable, and serial port. |
Applications
- Educational parking assistance prototypes.
- Obstacle detection demonstrations.
- Arduino and embedded systems laboratory experiments.
- Robotics projects requiring distance measurement.
- Beginner electronics and sensor-interfacing projects.
Future Improvements
You can extend this project with additional features:
- LCD display: Show the measured distance on a 16×2 LCD.
- Progressive buzzer alerts: Increase the alert frequency as an obstacle gets closer.
- OLED display: Show distance and parking status on a compact display.
- ESP32 integration: Send distance readings to a local web dashboard.
- Smart parking monitoring: Add wireless communication for a model parking system.
- Servo barrier: Build a miniature parking gate controlled by obstacle detection.
Advantages
- Low-cost and beginner-friendly design.
- Simple circuit and easy-to-understand code.
- Real-time distance measurements.
- Combines visual and audio alerts.
- Expandable for more advanced IoT projects.
Limitations
- Ultrasonic measurements can be affected by surface angle, object shape, and environmental conditions.
- Very close objects may fall outside the sensor's reliable measurement range.
- The project uses fixed distance thresholds and does not identify the type of object.
- This is an educational prototype, not a certified vehicle safety system.
Conclusion
The Arduino Car Parking Assistant demonstrates how an ultrasonic sensor, microcontroller, LEDs, and buzzer can work together to provide distance-based parking alerts. It is an excellent beginner IoT project for understanding sensors, embedded programming, and real-time hardware interaction.
By adding an LCD, wireless connectivity, or a progressive buzzer, you can develop the prototype into a more advanced smart parking assistance system.
Project category: IoT Projects
Difficulty: Beginner
Platform: Arduino Uno
Main components: HC-SR04 ultrasonic sensor, LEDs, and buzzer